Create an Arduino
This practice is to create an Arduino Uno board. We will design the plate based on the size of the original. The first thing we will do is take measures and design an original plate by Proteus. Once the plate with the location of its tracks and track changes designed'll take a copper plate and a CNC file will export our Proteus to manufacture the plate. Once we remacharemos plate track all changes and solder all the components needed to operate the plate.
Arduino Uno
Arduino is a free hardware platform based on a plate with a microcontroller and a development environment designed to facilitate the use of electronics in multidisciplinary projects.

Arduino Uno

The hardware consists of a plate with an Atmel AVR microcontroller and input / output. The most commonly used microcontrollers are the Atmega168, Atmega328, Atmega1280 and Atmega8 for its simplicity and low cost enable the development of multiple designs. On the other side is a software development environment that implements the language Processing / Wiring programming and the boot loader that is executed on the plate. The computer is programmed to control the board electronics.
The free integrated development environment can be downloaded free. Arduino can take information from the environment through their analog and digital inputs. It incorporates a reprogrammable microcontroller and a series of pin female inputs and outputs to connect easily and conveniently there different sensors so you can control lights, motors and other actuators. The Arduino microcontroller is programmed using the Arduino programming language (based on Wiring) and the Arduino development environment (based on Processing). The projects made with Arduino can run without connecting to a computer. It also has its own software that can be downloaded from their official website that already includes drivers of all available cards making easier loading codes from the computer.
The Arduino components are as follows
Bill Of
Materials For
Design
Title
|
|
Author
|
|
Document
Number
|
|
Revision
|
|
Design
Created
|
sábado, 04
de octubre de 2014
|
Design
Last Modified
|
miércoles,
16 de septiembre de 2015
|
Total
Parts In Design
|
59
|
0 Modules
|
||||
Quantity
|
References
|
Value
|
Stock Code
|
Unit Cost
|
Sub-totals:
|
€0,00
|
|||
12 Capacitors
|
||||
Quantity
|
References
|
Value
|
Stock Code
|
Unit Cost
|
6
|
C1,C3-C4,C10-C12
|
100n
|
€0,23
|
|
1
|
C2
|
1uF
|
€0,09
|
|
2
|
C5-C6
|
22pf
|
€0,12
|
|
1
|
C7
|
1uf
|
€0,09
|
|
2
|
C8-C9
|
47u
|
€0,52
|
|
Sub-totals:
|
€2,84
|
|||
16 Resistors
|
||||
Quantity
|
References
|
Value
|
Stock Code
|
Unit Cost
|
1
|
R1
|
10k
|
RS461-3745
|
€0,21
|
2
|
R2,R10
|
1M
|
RS223-2653
|
€0,05
|
5
|
R3,R6-R7,R13,R16
|
560R
|
RS223-2221
|
€0,09
|
3
|
R4-R5,R8
|
1K
|
RS223-2265
|
€0,03
|
3
|
R9,R14-R15
|
10K
|
RS461-3745
|
€0,21
|
2
|
R11-R12
|
22R
|
RS740-9173
|
€0,10
|
Sub-totals:
|
€1,68
|
|||
5 Integrated Circuits
|
||||
Quantity
|
References
|
Value
|
Stock Code
|
Unit Cost
|
1
|
U1
|
ATMEGA328P
|
RS738-0435
|
€2,67
|
1
|
U2
|
ATMEGA16U2
|
RS715-3791
|
€3,30
|
1
|
U3
|
NCP1117ST50T3G
|
RS802-2130
|
€0,01
|
1
|
U4
|
LP2985-33DBVR
|
RS660-6733
|
€0,72
|
1
|
U5
|
LMV358MGKR
|
RS660-6727
|
€0,04
|
Sub-totals:
|
€6,74
|
|||
1 Transistors
|
||||
Quantity
|
References
|
Value
|
Stock Code
|
Unit Cost
|
1
|
Q1
|
FDN340P
|
RS671-0435
|
€0,04
|
Sub-totals:
|
€0,04
|
|||
8 Diodes
|
||||
Quantity
|
References
|
Value
|
Stock Code
|
Unit Cost
|
4
|
D1-D3,D7
|
LED-YELLOW
|
RS692-1102
|
€0,58
|
3
|
D4-D6
|
DIODE
|
RS773-4514
|
€0,03
|
1
|
D8
|
LED-VERDE
|
RS692-1102
|
€0,58
|
Sub-totals:
|
€2,99
|
|||
17 Miscellaneous
|
||||
Quantity
|
References
|
Value
|
Stock Code
|
Unit Cost
|
1
|
FU1
|
0.5A
|
RS647-8156
|
€0,37
|
1
|
J1
|
CONN-SIL10
|
RS797-3233
|
€1,26
|
1
|
J2
|
CONN-H6
|
RS765-5672
|
€1,09
|
2
|
J3-J4
|
CONN-H8
|
RS797-3239
|
€1,67
|
2
|
J5,J7
|
ICSP
|
RS681-2931
|
€0,35
|
1
|
J6
|
CONN-DIL4
|
€0,35
|
|
1
|
J8
|
CON_USB_B
|
RS748-0866
|
€1,21
|
1
|
J9
|
POWER JACK
DC
|
RS 488-376
|
€0,40
|
1
|
JP1
|
JUMPER
|
RS745-7065
|
€0,07
|
1
|
L1
|
1u
|
RS724-1539
|
€0,01
|
1
|
S1
|
PULSADOR_DOBLE
|
RS378-6410
|
€0,32
|
2
|
VR1-VR2
|
VARISTOR
CG0603MLC-05E
|
RS690-9938
|
€0,10
|
1
|
X1
|
RESONATOR
|
RS792-6524
|
€0,24
|
1
|
X2
|
CRYSTAL
16MHZ
|
RS226-1831
|
€1,33
|
Sub-totals:
|
€10,89
|
|||
Totals:
|
€25,18
|
|||
Photos arduinoooooo components
Two components stand out in our Arduino
ATMEGA 328P
The 8-bit AVR Atmega328 is an integrated high-performance RISC microcontroller is based circuit, combining 32KB ISP flash memory with the ability to read-while-write, 1KB of EEPROM memory, 2KB of SRAM, 23 lines I / S general purpose registers 32 overall process, three flexible timer / counters with comparison, internal and external interruptions, USART scheduler mode, byte-oriented serial interface 2 wire SPI serial port, 6- channel 10-bit A / D converter (8-chanales in TQFP and QFN / MLF packages), "watchdog timer" programmable internal oscillator and five modes software selectable saving energy. The device operates from 1.8 to 5.5 volts. By executing powerful instructions in a single clock cycle, the device achieves 1 MIPS response, balancing power consumption and processing speed.


ATMEGA 16U2
The high-performance, low-power 8-bit Atmel AVR RISC-based microcontroller combine With 16KB ISP flash memory read-while-write capabilities, 512B EEPROM, 512-Byte SRAM, 22 general purpose I / O lines, 32 general purpose working registers, two Flexible timer / counters With compare modes and PWM, USART, programmable watchdog timer With internal oscillator, SPI serial port, debugWIRE interface for on-chip debugging and programming, and five software selectable power saving modes. The device Operates betweeen 2.7-5.5 volts.
By executing powerful instructions in a single clock cycle, the device achieves throughputs approaching 1 MIPS per MHz, balancing power consumption and processing speed.


Proteus start our project in this scheme based on the Arduino Uno we found in internet


So we have the plate in Proteus

This is a genaral view of the plate in Proteus

This is the part of Atmega 16U2

This is the part of Atmega 328P

This is the part of the Jack

This is the part of connections

This is the part of Reset and ISCP

This is the part of Bypass

This is the part of USB

3D view

3D view

Layout view
We will export our board design to computer CNC

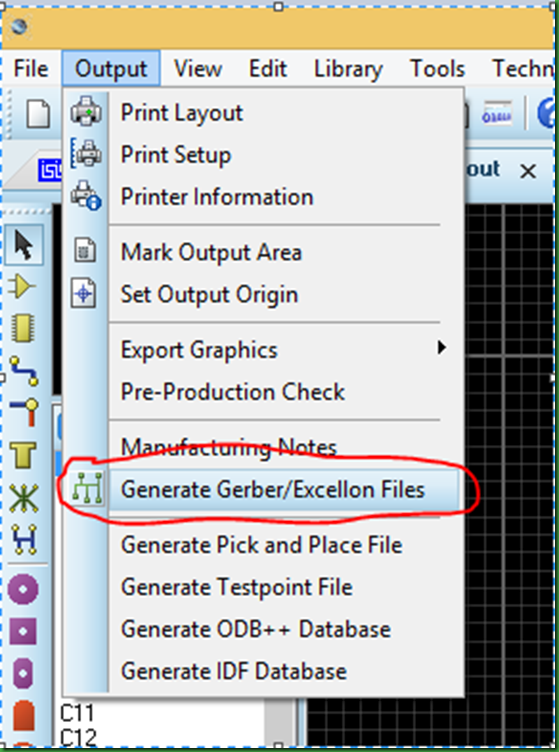

This is the CNC that we used
Once the plate on the CNC must be put rivets

Plate without rivets

Plate with rivets
Then we solder the components to the board
After soldering all the components on the board this is the end result, the board is ready.


Puedes pasarme tu correo para consultarte unas cuantas cosas?
ResponderEliminarwhere is the file??????????????? dude???????????
ResponderEliminar